How Accounting works
Before you start: For property records, add your properties in Settings. General entries do not need a property. For Airbnb income, complete an Airbnb History sync. Accounting uses the latest saved import for each listing.
Screenshots use sample data. Select any image to enlarge it.
Choose the property and period
Open Accounting. On Overview, choose the property and date range, then select Apply. All activity also includes entries not assigned to a property.
Under Airbnb income, choose Stay earnings to estimate income across occupied nights, or Payouts to use imported transaction dates. This changes Airbnb timing only; other income and costs keep their dates.
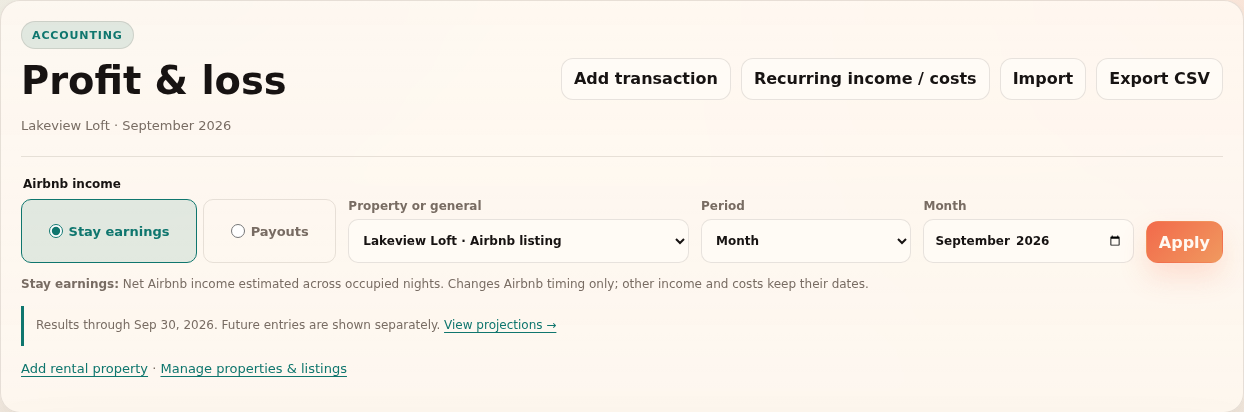
Choose the property, period and Airbnb income view for the report. Example · understand timing before comparing months A $1,000 net stay from January 27–February 6 contributes $500 to January and $500 to February in Stay earnings. If its imported payout date is March 3, Payouts shows $1,000 in March.
Both views describe the same income. Neither confirms that your bank received a deposit.
Add income, bills and recurring costs
Open Books or Add transaction to record other income and expenses. Assign the correct property, date, amount and category. Airbnb imports and Cleaning invoices already feed into Accounting; avoid entering them again.
Use Recurring income / costs for scheduled rent and repeating costs. Enter the full monthly amount, the property and applicable months. Mortgage periods require an end month. For bills that arrive by email, follow the automatic-bill workflow below.
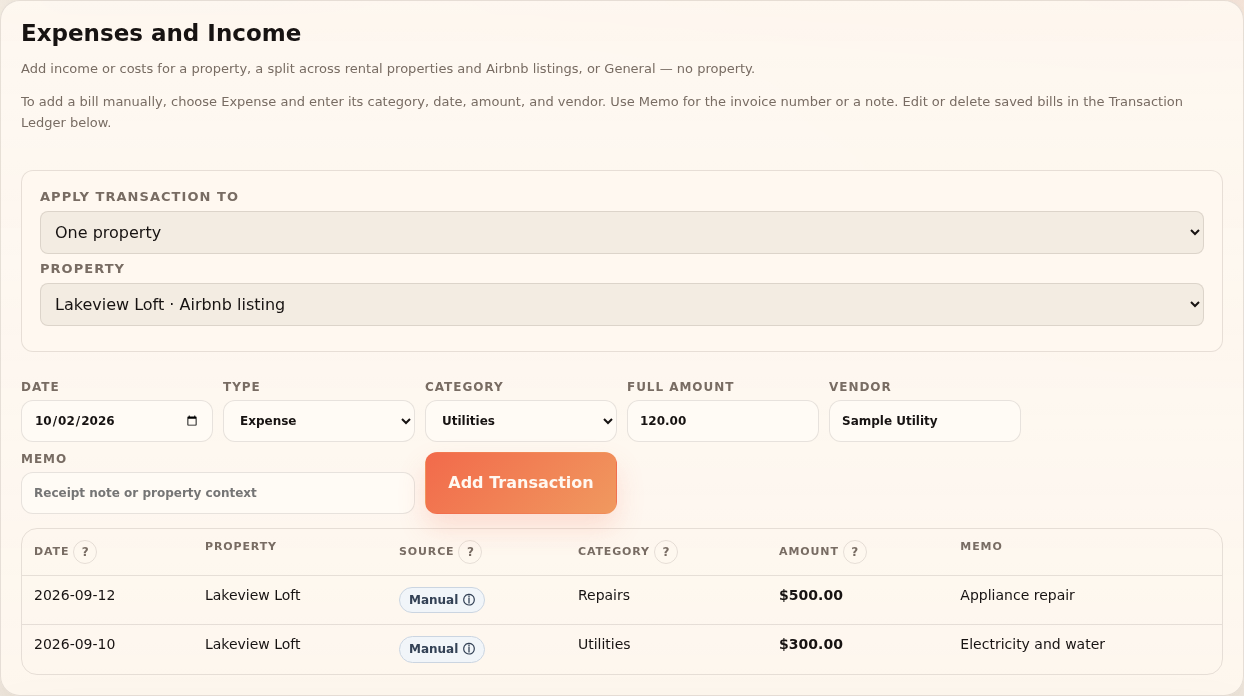
Enter the bill once, with its property, date, category and full amount. Set up automatic bills
Open Settings → Bill forwarding. Under Forward bills from, add the email addresses you or your team use to forward bills. Select Save bill forwarding, then Copy address to copy your account’s receiving address.
If the page says Email import is not connected yet, contact support before forwarding. The receiving mailbox must be connected for imports to work. Default listing applies to the text bill template; utility emails use the account mappings in the next step.
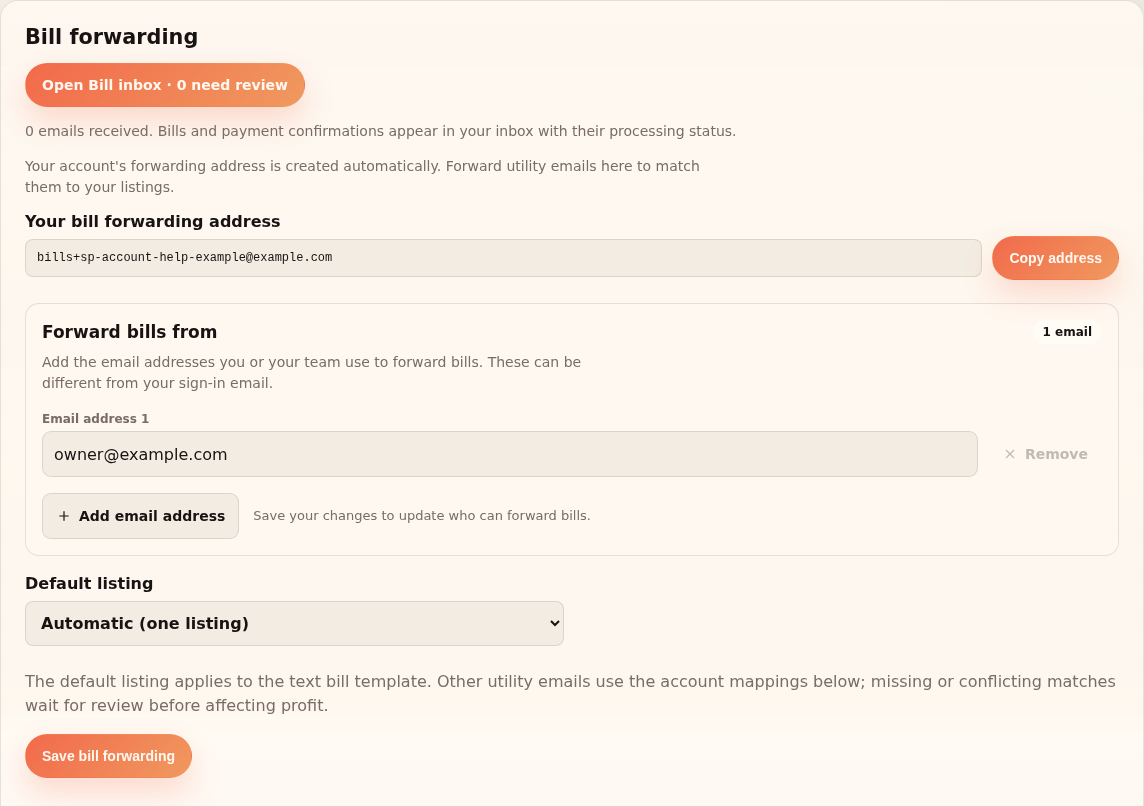
Save the email addresses you forward from, then copy your own receiving address. Match utility accounts to properties
In Utility account mappings, open Add a utility account. Choose the company and check its support note. Enter the utility account’s last four characters or full number—not a bank or card number.
Choose One property or Split between properties. Set percentages totaling 100%, select the services, then choose Add utility account. Saved mappings apply to future bills; existing bills keep their saved split.
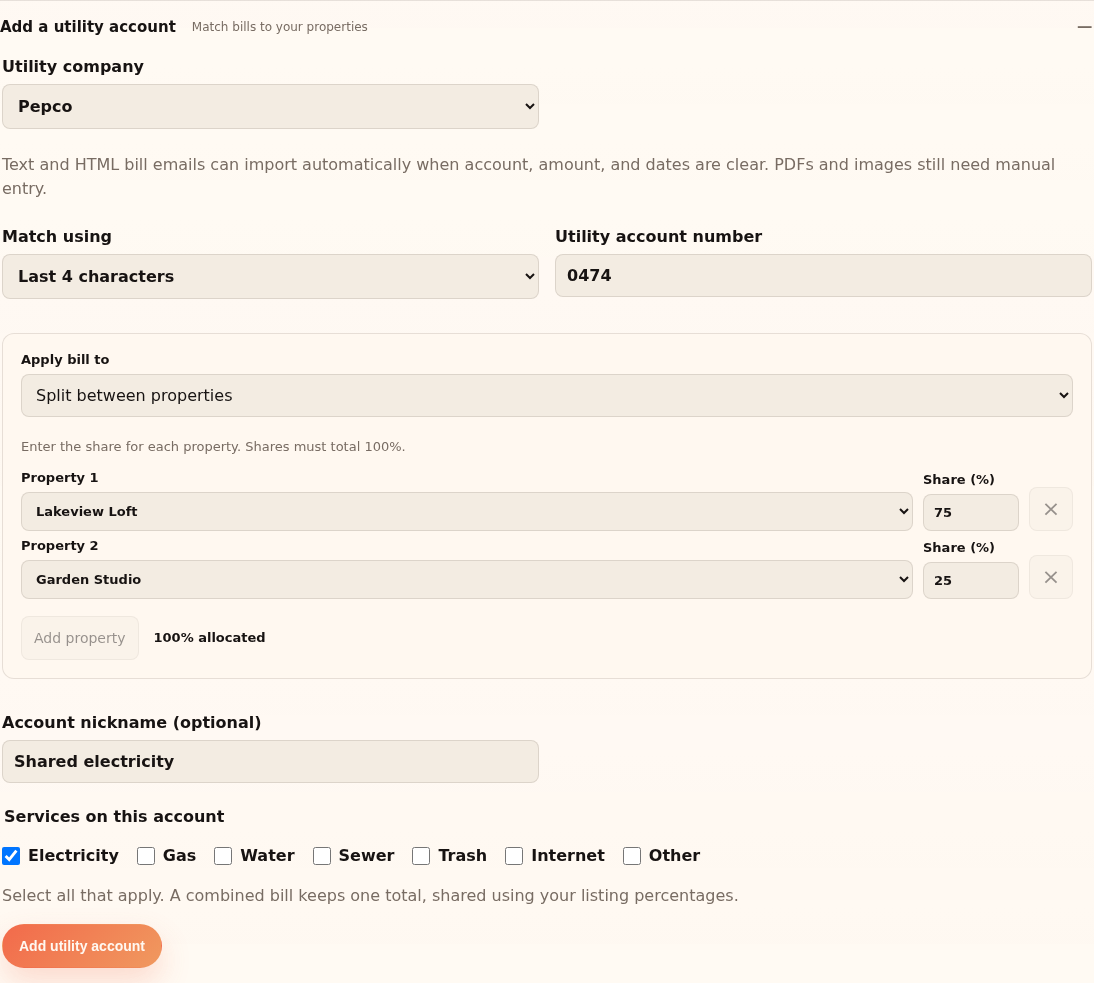
Map each utility account to one property or a split totaling 100%. Example · one $120 electricity bill - Lakeview Loft · 75%
- $90
- Garden Studio · 25%
- $30
- Total recorded
- $120
The bill is entered once and shared between the properties.
Forward a bill and check the result
Forward the utility email from a saved sender to your copied address, keeping the original bill details. Open Accounting → Bill inbox. New arrivals are checked automatically; Check Gmail now also checks for arrivals. Supported bills with clear account, amount and date details appear as imported under Recorded / matched.
If you use an automatic email-forwarding rule, test one bill first and check the result; provider and format support still apply. Email import reads supported text/HTML formats. PDF or image bills, and emails containing only a portal link, need manual entry or review.
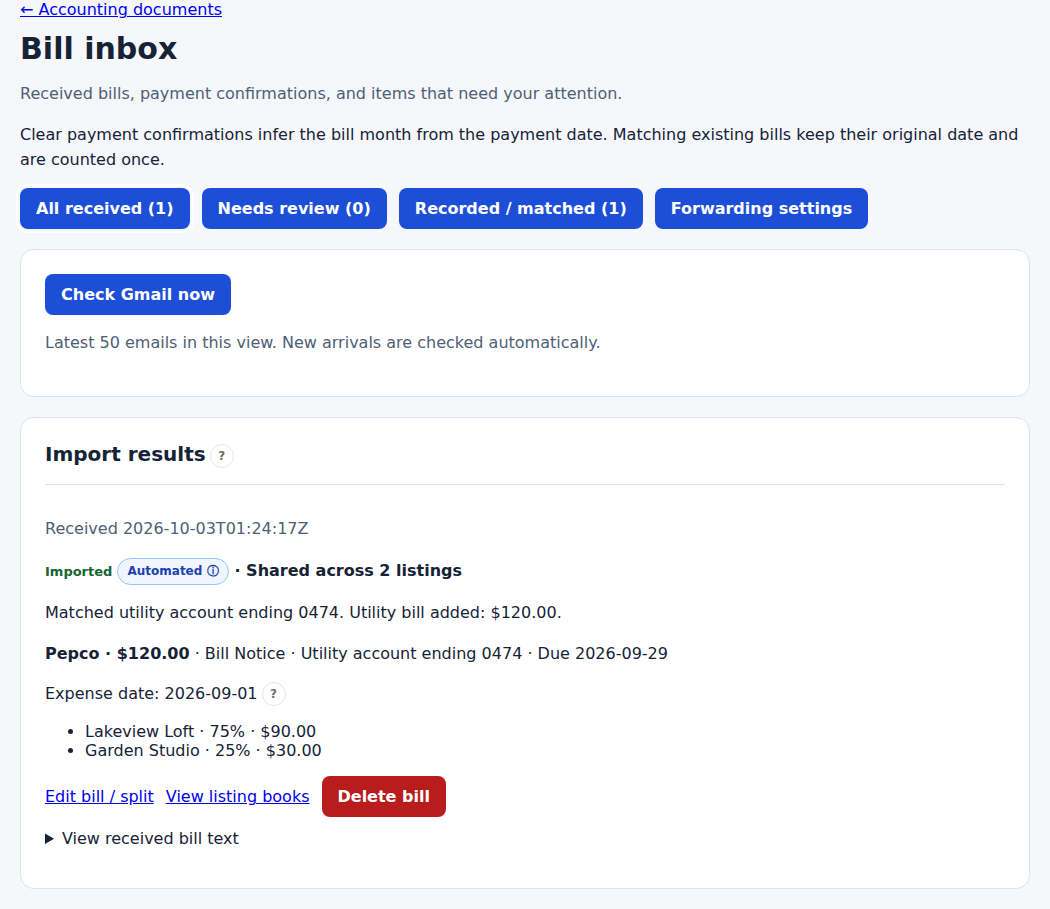
A supported bill is matched and recorded automatically, with its property shares shown in Bill inbox. Resolve a bill that needs review
Select Needs review and read the reason. If the utility account is missing or incorrect, fix its mapping in Settings and select Recheck account match.
When Review and add this bill is available, open it and check the original bill. Confirm the property or split, Expense date, Bill amount (USD) and Vendor, then select Add reviewed bill. Check any estimated month. Unsupported or unreadable bills can be entered manually in Books.
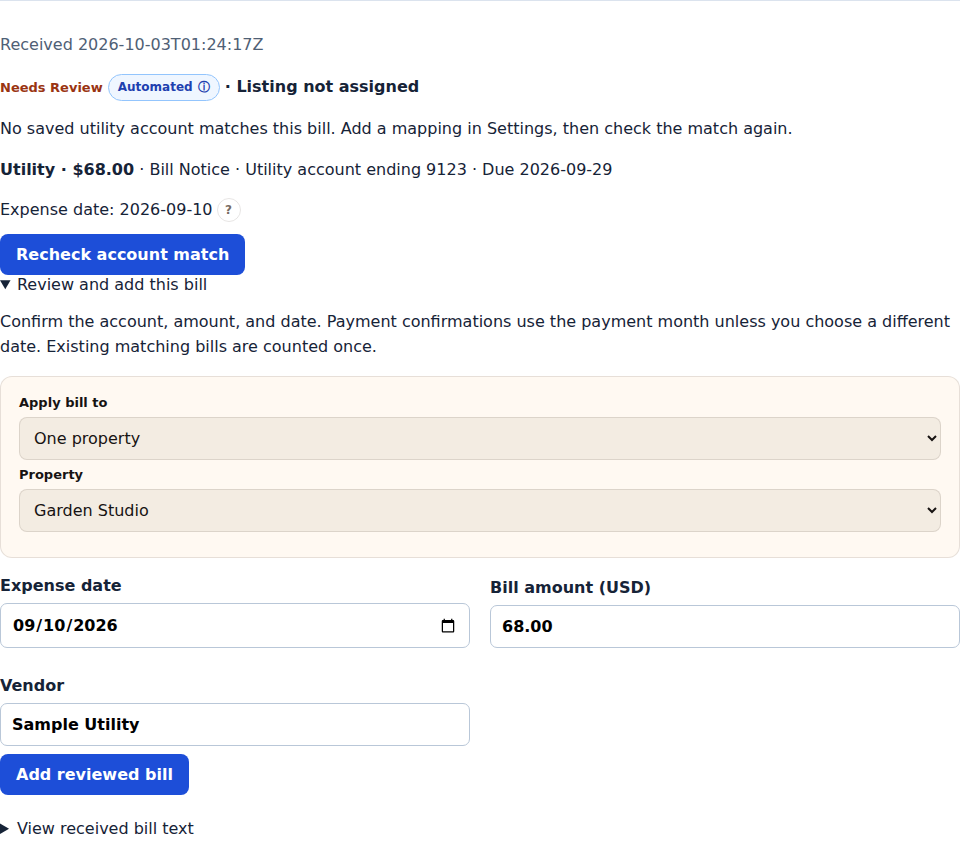
A different bill with an unmapped account waits for review before it affects your totals. Check the automatic entries in Books
Open Books, choose Source → Automated · Gmail and select Filter Ledger. Check the Automated badge, expense date and each property’s share. Use Edit bill / split to correct the full bill and its allocation together.
A clear payment-confirmation email can match an existing bill without adding another expense, keeping its original date. If no bill matches, a supported confirmation can record an expense using the payment date. Review inferred dates and avoid duplicating the same cost manually or through a recurring rule. Signal-Panda records bills; pay them through your usual provider.
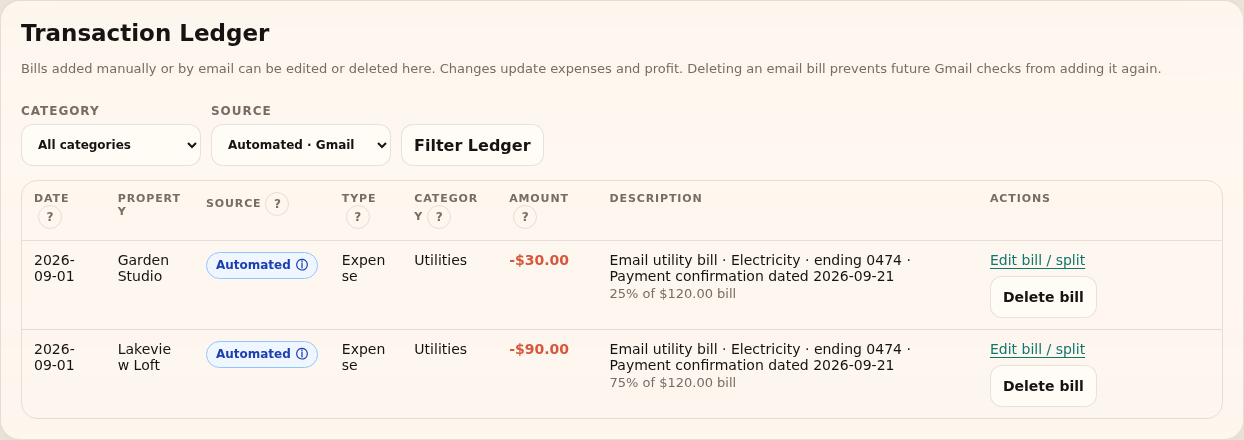
Books shows each property’s share with an Automated badge; the payment confirmation does not add a second expense. Read profit and money remaining
Operating profit / loss is income minus operating costs. After mortgage subtracts the full mortgage/loan payment. Open the breakdown to see what contributes, then use the monthly or property rows to investigate.
Mortgage principal is separated from operating costs. These reports help track your records; they do not prove a bill was paid or a deposit reached your bank.
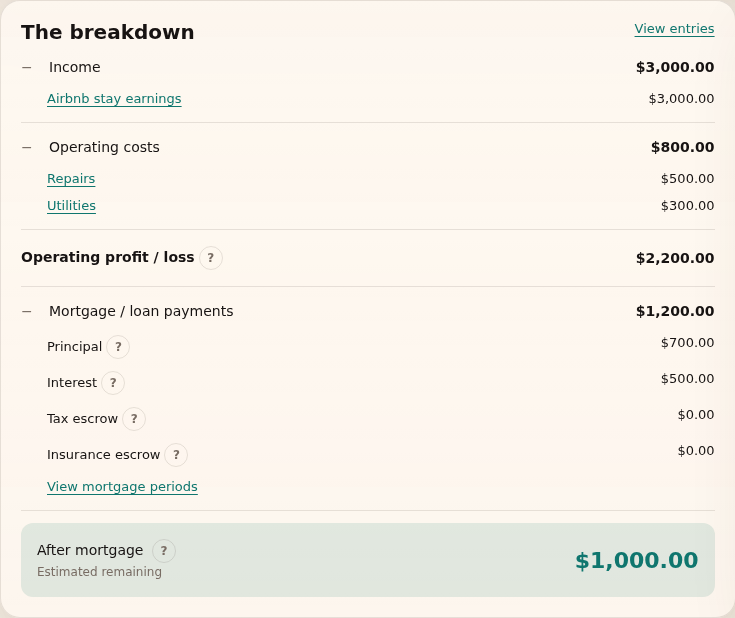
Expand the breakdown to see how income becomes money remaining after the mortgage. Example · a month at Lakeview Loft - Income
- $3,000
- Operating costs
- −$800
- Operating profit
- $2,200
- Mortgage / loan
- −$1,200
- After mortgage
- $1,000
The full loan payment reduces money remaining, even when part of it is principal.
Look ahead with Projections
Open Projections for future scheduled rent, imported upcoming Airbnb earnings, other future income, and expected costs. Check the selected period and refresh Airbnb History when bookings or payouts change.
Projections use imported expected earnings, not calendar nightly prices. They are estimates and remain separate from historical results.
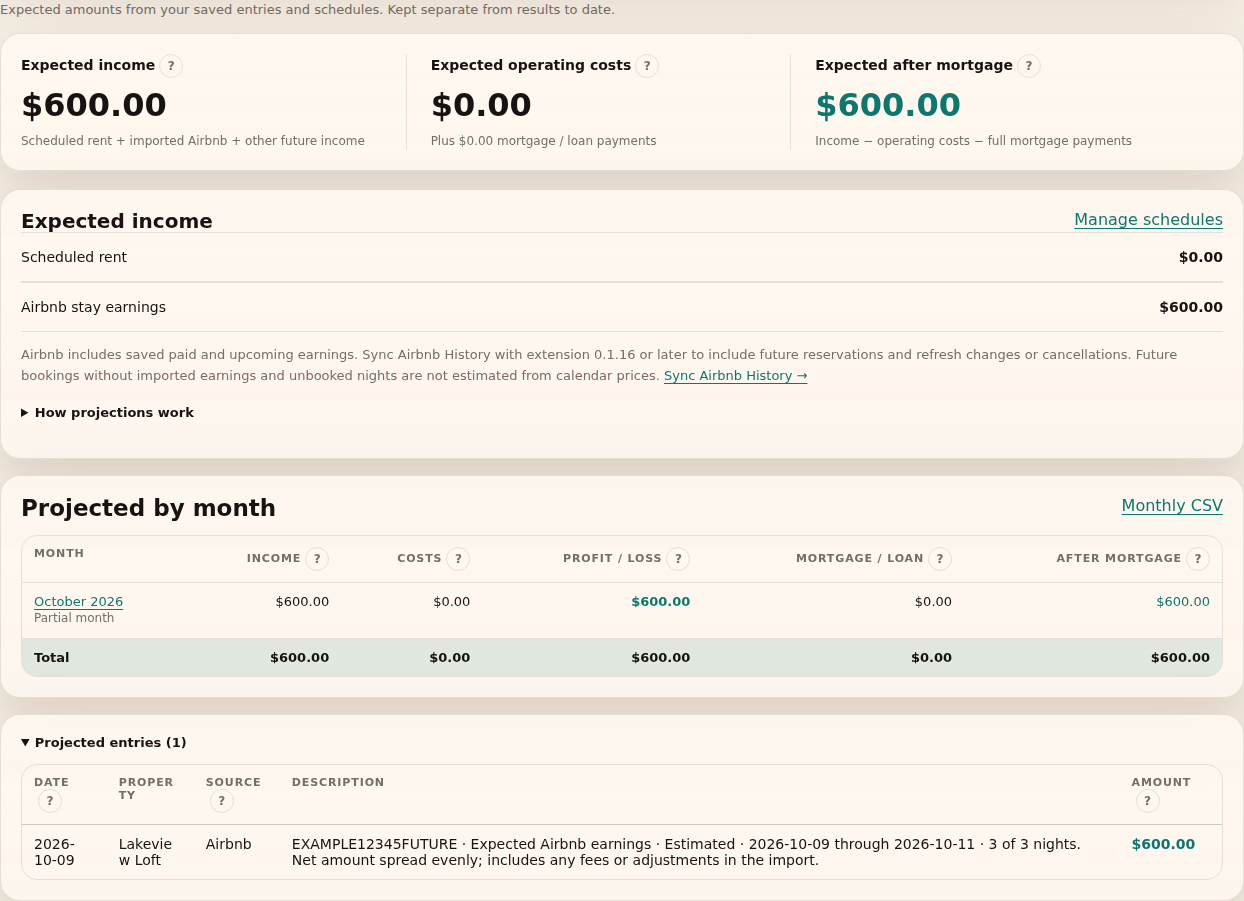
Projections keep future expected amounts separate from historical results. Check the records and export
Use Books to inspect the entries behind a total. Review missing dates, duplicate manual entries and property assignments before exporting. Use Documents for supporting records and Tax Prep to organize tax categories and documents.
Select Export CSV for the current report, or Export projections for a forecast. Keep the selected property, dates and Airbnb income view in mind when comparing files.
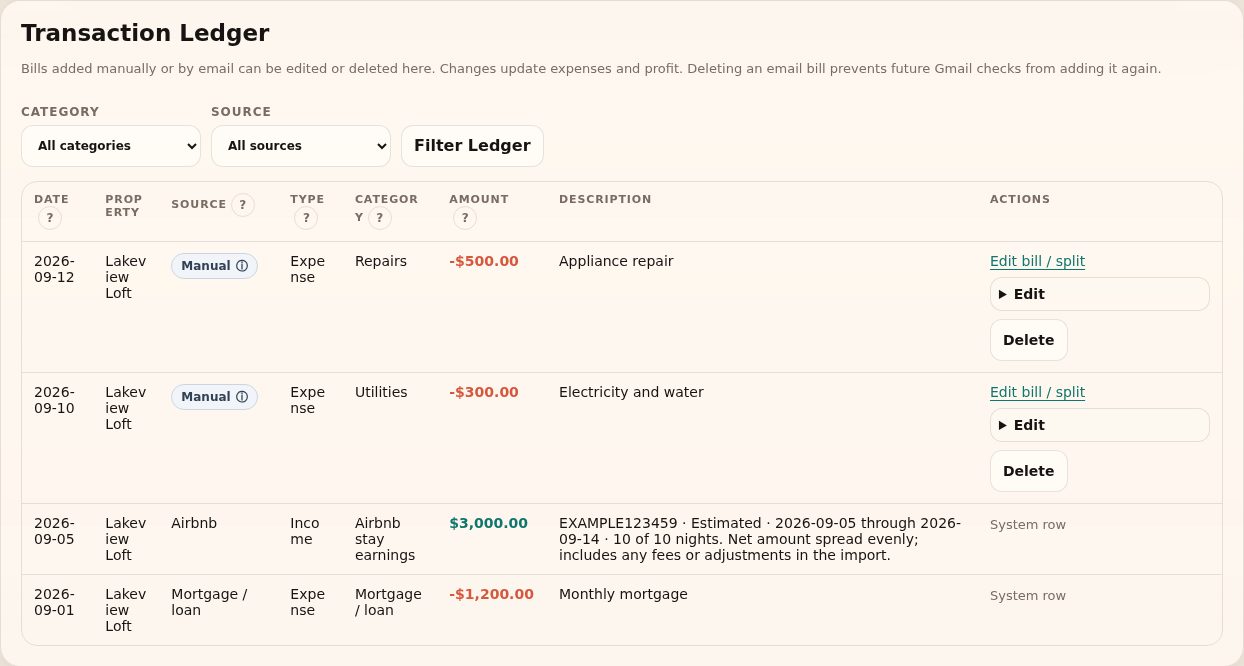
Review the entries and filters before exporting the report.
More use cases
Follow the walkthrough that matches what you need to do next. Screenshots use sample data; select an image to enlarge it.
- Set up monthly rent, change the amount, or end it
- Update a mortgage payment after an adjustment
- Upload documents and review the resulting records
- Split a manual expense between properties
- Record an expense that does not belong to a property
Set up monthly rent, change the amount, or end it
Use this for ongoing scheduled rent that is not already supplied by a linked lease.
- Open Books → Recurring Income and Costs. Choose Rental income, the property, a name for the tenancy, the monthly amount and start month. Leave the end month blank for ongoing rent, then select Add Monthly Rent.
- Check the saved schedule and report dates. Entries through today appear in regular reports; future scheduled entries appear in Projections. These entries represent scheduled rent, not confirmed receipt.
- For a rent change, set the existing card’s End Month (optional, inclusive) to the month before the change and choose Save End Month. Add a new schedule with the same name and the new amount starting the following month.
- To stop the schedule, save its final included month. Use the end month to retain earlier entries; Remove removes the rule’s historical entries as well.
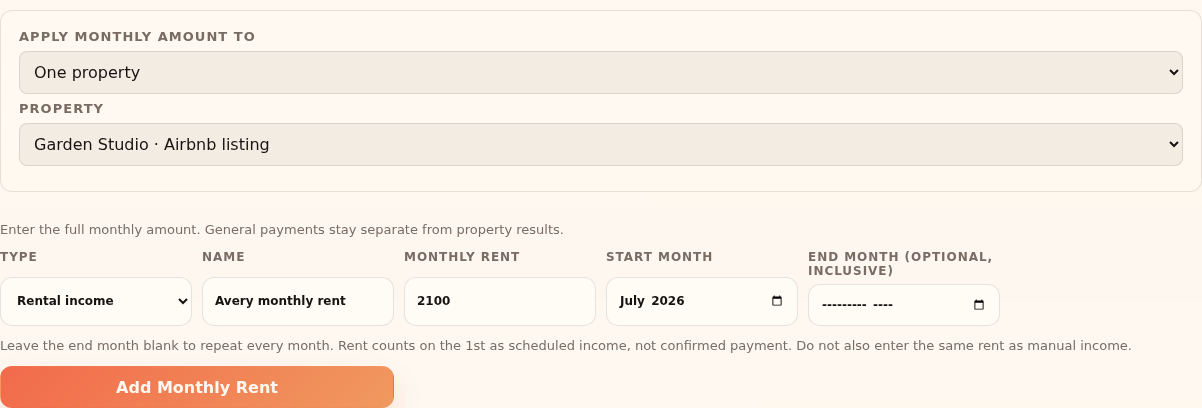
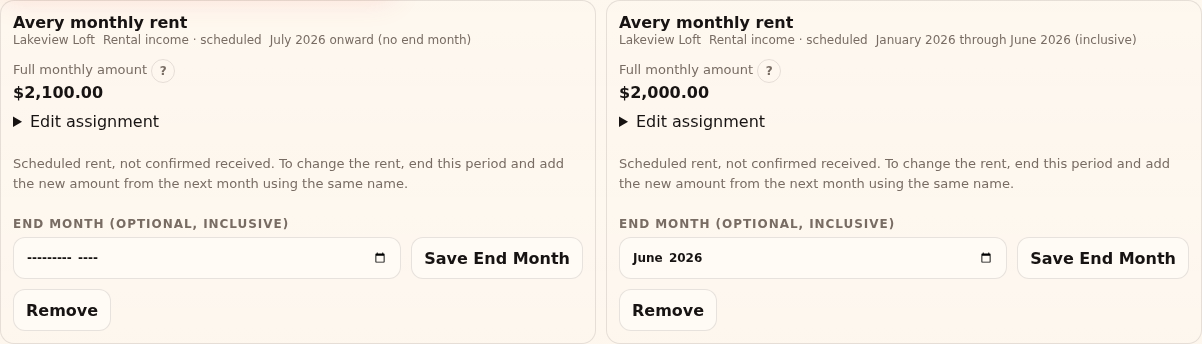
Example: For rent increasing from $2,000 to $2,100 in July, end the $2,000 period in June and start the $2,100 period in July. The periods must not overlap.
What to expect: Earlier months retain the old amount and later months use the new schedule. Manual recurring rent uses the first of each month and does not prorate partial months.
For a completed Signal-Panda lease, use Add to accounting instead of duplicating its rent with another schedule.
Update a mortgage payment after an adjustment
Use this when a new regular payment takes effect and past months must keep their original amount.
- Open Recurring Income and Costs and find the existing mortgage period. Set its final included month and select Save End Month.
- Choose Mortgage / loan for a new period. Use the same property or property split and loan name, enter the full regular monthly payment including escrow, and set its start and end months.
- Start the new period in the following month and select Add Mortgage Period. Both boundary months count; periods for the same loan and property cannot overlap.
- Compare a month before and after the adjustment in the report’s mortgage breakdown, and inspect future months in Projections.
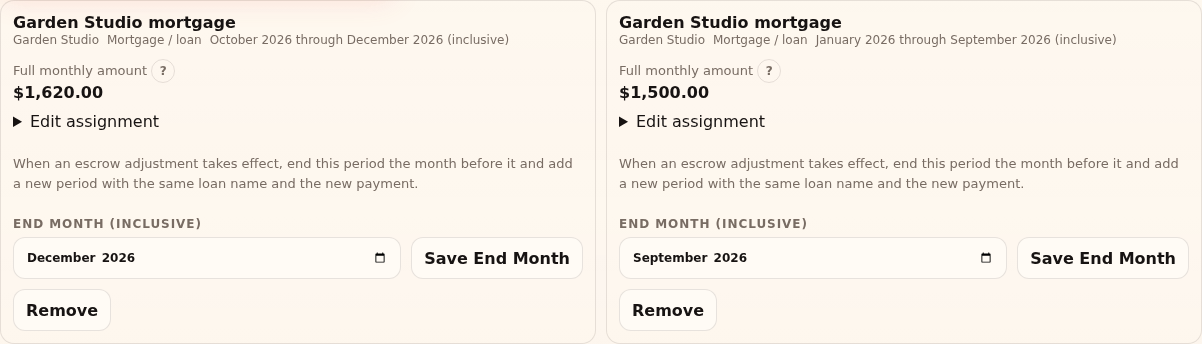
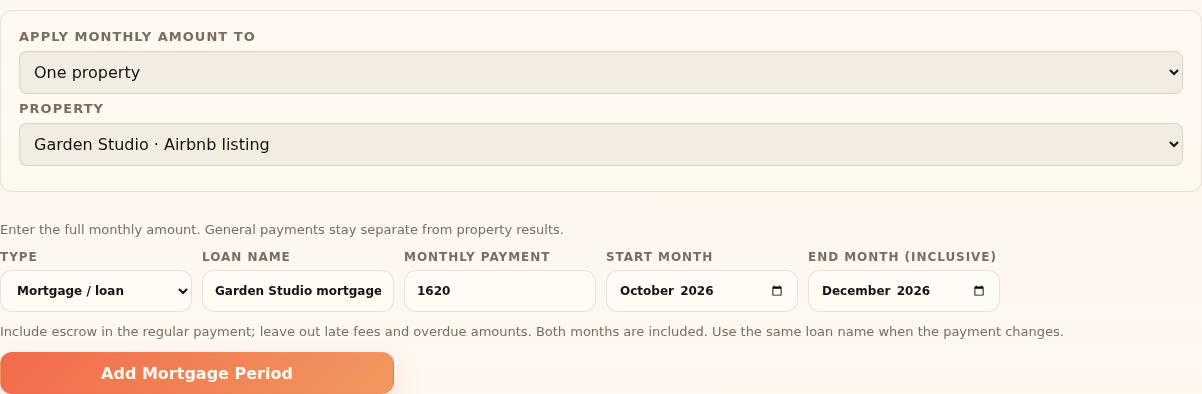
Example: If the payment rises from $1,500 to $1,620 in October, end the old period in September. The new period begins in October and needs its own end month.
What to expect: The report uses the applicable full payment for each month. Enter the regular payment, excluding overdue amounts and late fees; a total alone does not supply an interest or tax breakdown.
Upload documents and review the resulting records
Use this for statements, receipts or tax documents, including PDF and image files that email bill intake cannot read automatically.
- Open Documents. If the page reports that parsing is not configured, contact support before importing. Choose files or drop them into Document Intake, respecting the displayed size limit.
- Choose the property, or No property / tax-only for an applicable tax document. Select Classify and Fill Sections. This imports records; it is not just an upload preview.
- Follow each file’s result. If prompted to create a missing property, check its name and address and choose Airbnb listing or Rental property. An Airbnb property needs its listing ID.
- Review successful imports and warnings in Documents. Check transaction entries in Books, mortgage periods in Recurring Income and Costs, and tax-document records in Tax Prep. Check what succeeded before retrying failed files.
- For tax preparation, select the intended property and period in Tax Prep, review categories and imported records, then choose Export CPA CSV.

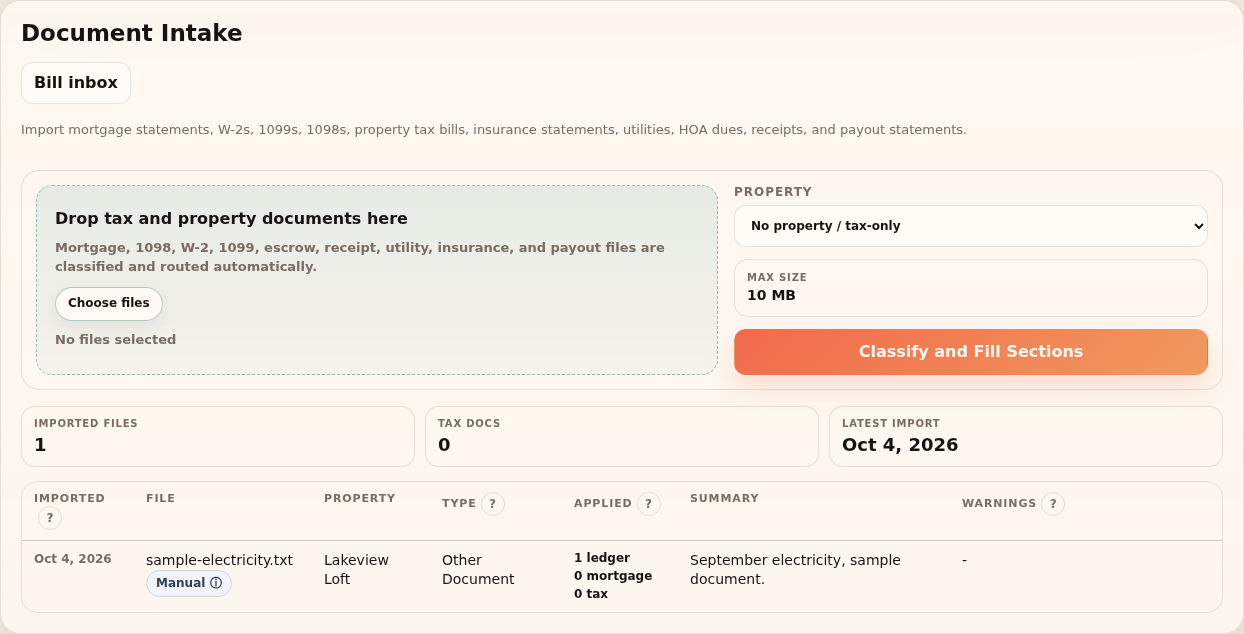
Example: A receipt may add a ledger expense, a mortgage statement may add a payment period, and a W-2 may add a tax-document record. Review the matching section for each file.
What to expect: The imported records can be reviewed and exported. Keep your original files: document intake does not retain the uploaded file bytes.
Split a manual expense between properties
Use this for one shared bill that benefits more than one saved rental property or Airbnb listing.
- Open Books → Expenses and Income. Choose an expense and Split between listings. Enter the full bill amount once.
- Add each property and a positive percentage. Use distinct properties and make the percentages total 100%. Enter the date, category and vendor, then select Add Transaction.
- Check each property’s share in Books and compare the combined total. To correct the amount or allocation, use Edit bill / split to edit the whole bill together.
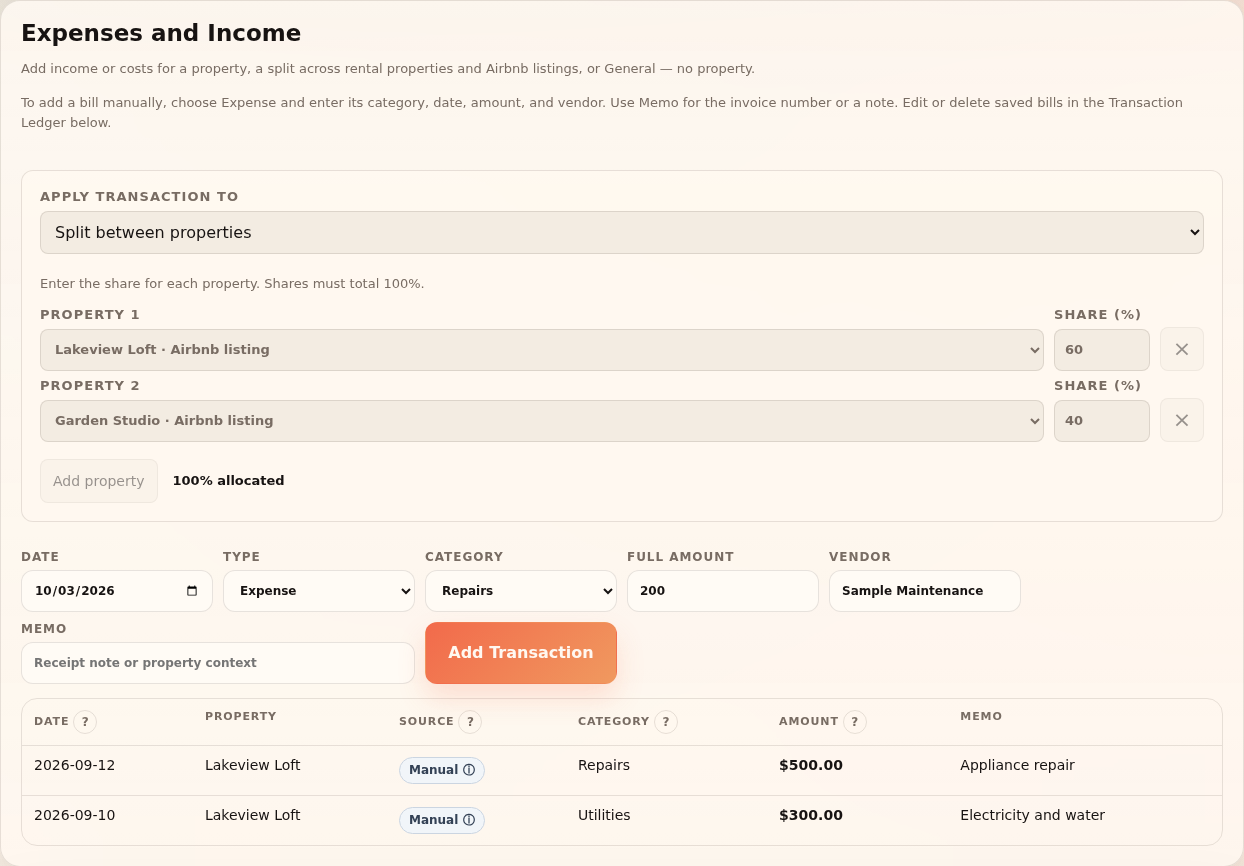
Example: A $200 maintenance bill split 60% to Lakeview Loft and 40% to Garden Studio records $120 and $80. Combined expenses remain $200.
What to expect: Each property report includes its share. Do not also add the full bill separately to either property. Deleting the shared bill removes all its shares.
Record an expense that does not belong to a property
Use this for an account-wide cost you want to track separately from property results.
- Open Books, choose Expense and explicitly select General — no property. Enter its date, amount, category and memo, then select Add Transaction.
- For a repeating cost, use the same General choice in Recurring Income and Costs and enter its monthly amount and period.
- Review All activity or the General filter. A report filtered to a specific property excludes General entries.
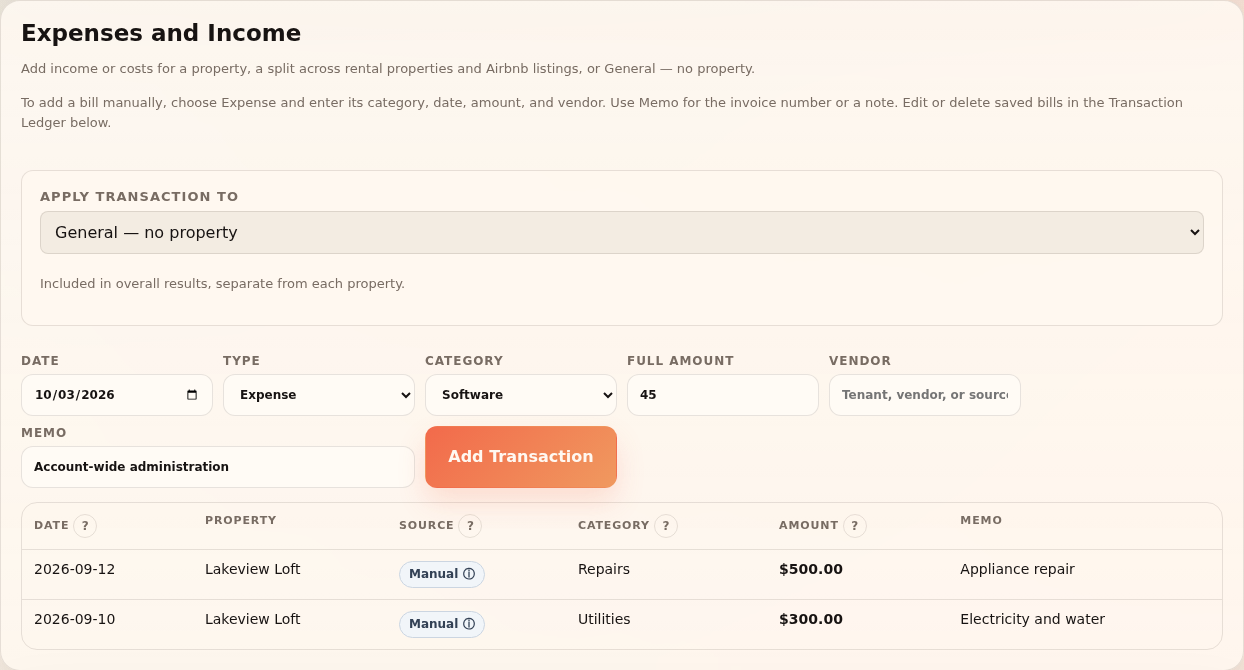
Example: Record an account-wide administrative cost under General if you want it separate from your individual property results.
What to expect: Overall results include the cost once, with a separate General row. General cannot be combined with property percentages in one split.
Frequently asked questions
Why don’t Accounting and Airbnb History totals match?
Compare the same properties, period, currency and income view. Accounting also includes other income, Cleaning invoices and costs. Check that History has finished importing before comparing.
What if an entry has no date?
Undated entries remain visible in all-time totals and Books, but are excluded from date-limited reports and timelines. Use Review all dates when that notice appears. Incomplete stay dates can also prevent an earnings split.
Does recording a bill pay it?
No. Accounting tracks records and payment status. Make the payment through your usual provider, and check imported or manual records against your statements.
Why didn’t a forwarded bill import automatically?
Check that email import is connected, the forwarding sender is saved, and the utility account matches a property mapping. The company’s support note identifies supported formats. Open Needs review for incomplete or unsupported bills; PDF/image attachments are not automatically read by email intake.